
Image blur is a visual effect used in photography, graphic design, and digital editing to soften an image or a specific area, reducing its sharpness. This technique can be applied in various ways to achieve different artistic or functional results. Blur is commonly used to create a sense of depth, direct focus to a particular subject, or convey motion, like in action shots. It also serves privacy and security purposes, such as obscuring faces, license plates, or sensitive information in images. While it’s often used creatively in design, blur can also be a tool for correcting imperfections or enhancing other elements in the image. There are various types of blur techniques, such as Gaussian blur, motion blur, and lens blur, each creating a unique effect. Whether for artistic expression, technical enhancement, or protecting privacy, image blur is a versatile tool in both professional and casual photo editing.
Types of Image Blur
Gaussian Blur
- What it is: A popular blur effect that softens the image by averaging the pixels around the targeted area. It creates a smooth and even blur, making the image look softer and less sharp.
- Use case: It’s often used to reduce noise or create a soft focus effect in portraits or backgrounds. It’s also useful for blending elements or creating a dreamy atmosphere.
- How it works: It applies a mathematical formula to each pixel in the image, making it appear less distinct.
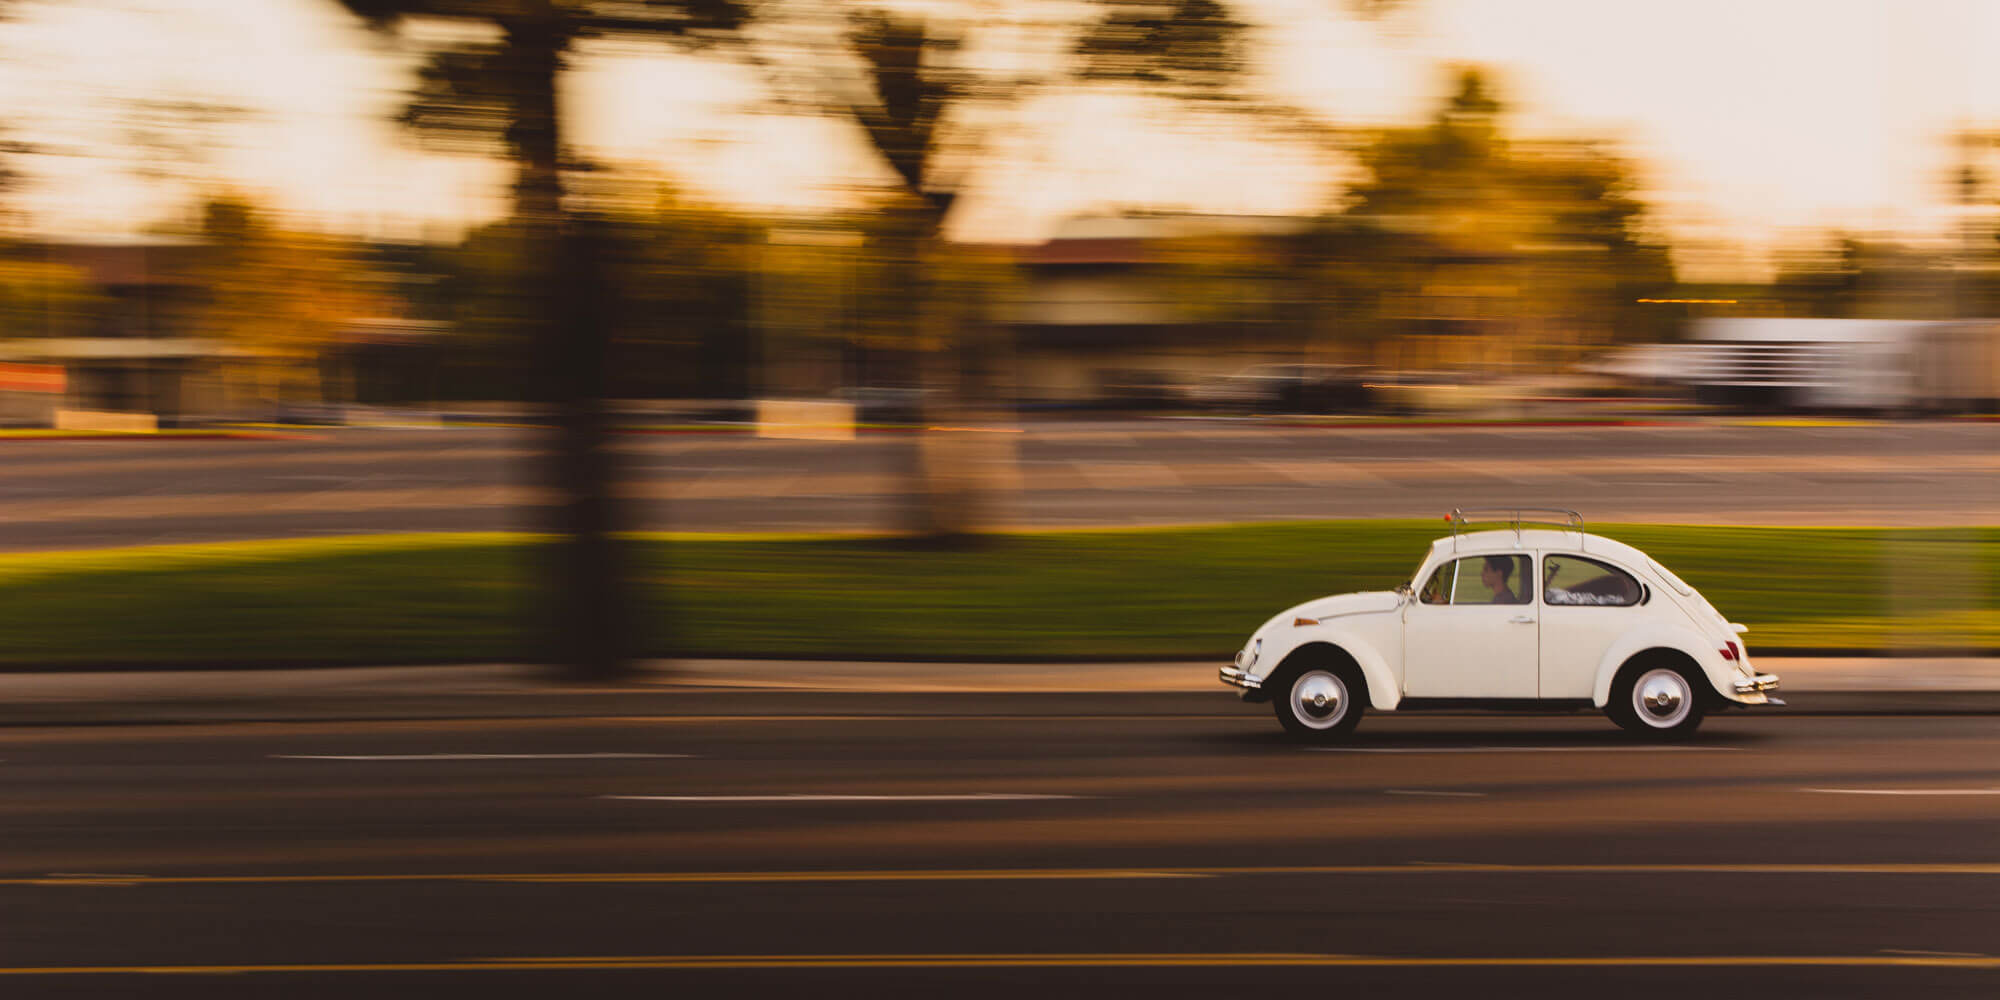
Motion Blur
- What it is: This type of blur simulates the effect of movement, creating streaks or trails in the direction of motion. The blur mimics the visual distortion that occurs when an object moves quickly.
- Use case: It’s commonly used in action shots, sports photography, or to convey a sense of speed or dynamic motion. It can also be applied creatively in art and design.
- How it works: The blur effect is applied along a specified direction, with the strength of the blur increasing as you move away from the center of the motion.
Radial Blur
- What it is: Radial blur creates a blur effect that radiates from a central point, giving the appearance of rotation or zooming. It can produce a circular or spiral blur pattern.
- Use case: This type of blur is often used to highlight a subject while keeping the center in focus or to create a spinning or swirling effect. It’s also useful in simulating the motion of a rotating object.
- How it works: The blur effect spreads outward from a central point, often with an option to control the speed and direction of the blur.
Lens Blur
- What it is: Lens blur simulates the depth-of-field effect produced by camera lenses, where parts of the image in front or behind the focus point appear blurry. The blur has a more realistic, organic feel, similar to what you see with real camera lenses.
- Use case: It’s used to blur the background of a portrait or subject, helping to separate the subject from the background and create a shallow depth of field effect, enhancing the focus on the subject.
- How it works: It mimics the characteristics of real camera lenses, such as bokeh (the aesthetic quality of the blur), and applies a gradual blur that becomes stronger the further an area is from the focus point.
Box Blur
- What it is: Box blur is a simple blur method where the average value of pixels in a square or rectangular area is calculated, and the pixel values are replaced with this average. This produces a relatively uniform blur effect.
- Use case: It’s used when you want a fast, less computationally expensive blur effect. It’s less refined than Gaussian blur and often used for practical purposes rather than creative design.
- How it works: The pixels are averaged over a box-shaped region, which means the blur effect is more uniform and less smooth than other types of blur.
Zoom Blur
- What it is: Zoom blur simulates the effect of a camera zooming in or out during the exposure, creating a radial blur that mimics the appearance of motion or speed.
- Use case: It’s used to convey a sense of fast motion or to add dramatic emphasis on a subject, often in visual effects or experimental photography.
- How it works: The blur is applied in a radial pattern around a central point, and the strength of the blur increases as it moves toward the edges of the image.
Surface Blur
- What it is: Surface blur selectively blurs an image without affecting the edges, allowing for smoother skin or texture while keeping the edges sharp. It’s more advanced than standard blur techniques and often used in retouching.
- Use case: Common in portrait photography, it’s used to smooth skin or remove imperfections while maintaining the sharpness of important details like eyes or hair.
- How it works: The algorithm detects edges and tries to keep them sharp while blurring areas without edges, providing a cleaner, smoother result.
How to blur an image
Blurring an Image Using Online Tools
Online tools provide a quick and easy way to blur images without the need for software installation. Here’s how you can do it:
- Step 1: Open an online photo editor like Canva, Fotor, or Pixlr.
- Step 2: Upload the image you want to blur.
- Step 3: Select the blur tool. This is typically found in the effects or adjustments menu.
- Step 4: Apply the blur effect. You can usually adjust the intensity or radius of the blur, deciding how soft or strong you want it to appear.
- Step 5: (Optional) Use a selection tool to blur only specific parts of the image.
- Step 6: Save the blurred image by downloading it in your preferred file format (JPG, PNG, etc.).
Online editors usually allow you to blur the whole image or just parts of it with a brush tool, making them perfect for simple tasks.
Blurring an Image Using Desktop Software
Software like Adobe Photoshop or GIMP offers advanced options for blurring images. Here’s a general process for blurring in Photoshop:
- Step 1: Open the image in Photoshop.
- Step 2: If you only want to blur certain areas, select those areas with tools like the Lasso Tool, Marquee Tool, or Quick Selection Tool.
- Step 3: Go to the Filter menu and select Blur. Photoshop provides several types of blurs like Gaussian Blur, Motion Blur, and Lens Blur.
- Step 4: Choose the blur type you want. For example, Gaussian Blur is great for softening an image, and you can adjust the slider to control how much blur is applied.
- Step 5: Once you’re satisfied with the blur effect, press OK.
- Step 6: Save the image in your desired file format.
You can also use the Layer Mask to apply the blur only to specific parts of the image, creating more control over the effect.
Blurring an Image Using Mobile Apps
For blurring images on mobile devices, apps like Snapseed, PicsArt, and Adobe Lightroom are popular choices. Here’s how you can blur an image using Snapseed:
- Step 1: Open the image in the Snapseed app.
- Step 2: Tap on the Tools icon and select the Lens Blur tool.
- Step 3: Position the blur effect on the image. You can drag the blur area and adjust its shape and intensity.
- Step 4: Adjust the blur’s strength using the slider to make it more subtle or intense.
- Step 5: Save your image by tapping Export.
Many apps have similar tools for blurring, making it simple to blur specific parts of the image or apply a general blur effect.
How to Control the Intensity of Blur
The level of blur applied can be adjusted in most image editors. The intensity of the blur depends on factors such as:
- Blur radius: This refers to how much of the image will be affected. A larger radius means a stronger blur effect.
- Threshold: Some tools allow you to adjust how much of the image is affected by the blur, helping you avoid blurring areas that should remain sharp.
- Layer mask adjustments: In programs like Photoshop, you can fine-tune the blur effect using a layer mask to blur only specific areas of the image while keeping other parts sharp.
Saving the Blurred Image
Once you’re happy with the blurred effect, save the image:
- Online Tools: Look for a “Download” or “Export” button.
- Desktop Software: Use File > Save As to save the image in the desired format (e.g., JPEG, PNG).
- Mobile Apps: Usually, you can save the image by tapping Export or Save after editing.
Additional Tips
- Use a gradient blur: For a more dynamic effect, try applying a gradient blur, where one part of the image is sharply in focus and the blur gradually increases in intensity as you move across the image.
- Don’t overdo it: Sometimes, too much blur can make an image look unnatural, so balance the effect according to your needs.
How to Control the Intensity of Blur
Adjusting Blur Radius
What is the radius?
- The blur radius determines how much area around the blurred point will be affected. A larger radius creates a stronger, more intense blur, while a smaller radius results in a subtler effect.
How to adjust:
- In most editing software, such as Photoshop or online editors like Pixlr, you’ll find a slider for “Radius” when applying a blur.
- Increase the radius for a stronger blur effect, or decrease it for a more delicate, controlled blur.
Using the Intensity or Strength Slider
- Some programs, such as Snapseed or Photoshop, allow you to control the “Strength” or “Intensity” of the blur. This works similarly to adjusting the radius but focuses more on how noticeable the blur is.
- A higher strength creates a more pronounced blur, making objects in the image appear more out of focus.
- A lower strength gives a softer, less intrusive effect.
Blurring Selective Areas (Layer Masking)
How to do it:
- Use a layer mask or selection tool in software like Photoshop or GIMP. This lets you apply blur only to certain parts of the image.
- You can adjust the strength of the blur specifically in the masked areas by applying less or more intensity based on the layer settings.
- For example, if you want to blur a background while keeping the subject in focus, you can selectively blur the background with varying intensities for a natural depth of field effect.
Blurring with Gradients
How to use gradients:
- Some editors allow you to apply a blur gradient, where the intensity of the blur increases or decreases gradually across the image.
- For example, in Photoshop, you can use a gradient tool to make a smooth transition from a sharp part of the image to a blurred part.
- This technique works well when you want a soft focus effect without abrupt transitions.
Controlling Blur with Opacity
- In some image editors, you can control the opacity of a blurred layer. Reducing the opacity makes the blur less noticeable and more subtle.
- This technique is commonly used when you’re combining multiple layers (such as a blurred background layer) and want the blur effect to be softer.
Gaussian Blur Specifics
- When using Gaussian blur, the intensity is controlled by both the radius and the amount of blur applied.
- For a subtle blur, a small radius with a low intensity will work, while a large radius with high intensity creates a more drastic effect.
Fine-Tuning with Preview Mode
- Many editing tools allow you to see a preview of your blur before finalizing it. By toggling the preview on and off, you can get a real-time sense of how the blur intensity impacts the image and adjust accordingly.
Tip for Natural Blurring
- If you want the blur to look natural, experiment with layering different levels of blur. For example, apply a mild blur to the whole image first and then use stronger blur settings on the background or less important areas. This mimics the depth-of-field effect seen in real photography.
Tips for Effective Image Blurring
Know Your Purpose
Before applying blur, it’s essential to know why you want to blur an image. The blur type and intensity will depend on your goal:
- Aesthetic Effects: For creating artistic or dreamy visuals, subtle blur works best. Use gentle blur to add a soft feel to the image.
- Focus: If you want to draw attention to a specific part of the image (e.g., a subject), apply blur to the background or surrounding areas. This effect is similar to the “bokeh” used in photography.
- Privacy: To protect sensitive information or faces, use blur selectively over these areas (e.g., faces, license plates, or names) while keeping the rest of the image sharp.
Control the Intensity
- Adjust Blur Radius: Many tools allow you to control how strong or subtle the blur is. A higher blur radius results in a more pronounced blur. For a soft, gentle blur, use a low radius, while for a dramatic effect, increase the blur intensity.
- Avoid Overblurring: Too much blur can degrade the quality of the image. When blurring for artistic or emphasis purposes, it’s often better to err on the side of subtlety.
Selective Blurring
- Isolate Specific Areas: Instead of blurring the entire image, use selection tools to blur only certain areas. For instance, blur the background to emphasize the main subject. Most editing software provides tools like a brush, gradient, or lasso tool for this.
- Layer Masking: If you’re using advanced software like Photoshop, layer masking allows you to blur parts of the image non-destructively, meaning you can easily adjust the blur later or remove it entirely if needed.
Combine Blur with Other Effects
- Contrast and Sharpness: Blur can work even better when combined with contrast and sharpness adjustments. For instance, blurring the background while increasing the sharpness of the subject in the foreground can create a nice depth effect, commonly seen in portrait photography.
- Vignetting: A vignette effect darkens the edges of an image, which pairs well with a blurred background to draw the viewer’s attention toward the center.
Mind the Image Quality
- Resolution Matters: Blurring can soften details and reduce sharpness, which could be problematic if the image has low resolution to begin with. Always ensure the original image is high-quality to retain clarity when applying blur.
- Avoid Loss of Details: If you blur an image too much, you may lose important visual details. Always preview your changes and adjust as needed to avoid obscuring key information.
Use Different Blur Types for Different Effects
- Motion Blur: If you’re trying to simulate movement or action, motion blur can add a dynamic feel to the image. You can control the direction and length of the blur to suggest speed.
- Gaussian Blur: This is great for softening harsh lines or creating a dreamy effect, especially in portraits or background scenes.
- Radial or Zoom Blur: These blurs create a circular or zooming effect and are often used to simulate spinning motion or to emphasize a central subject by keeping it sharp while blurring outward.
Test the Effect on Different Areas
Experiment with how the blur looks on different parts of the image before finalizing it. Try blurring different areas slightly or intensely to see which version enhances the visual appeal the most. For example, a slight blur around the edges can create a “soft focus” look, while stronger blur in the background makes the subject stand out more.
Maintain Natural Transitions
When blurring, ensure that the transition between the blurred and sharp areas looks natural. Harsh edges where sharpness abruptly changes to blur can look artificial. Use feathering techniques or a gradual blur to create a seamless and professional look.
Experiment with Blur and Light
Lighting plays a huge role in the impact of your blur effect. When blurring backgrounds or creating depth of field effects, make sure the light areas and shadows are balanced to maintain a realistic and visually appealing outcome.
Keep the Focus on Composition
No matter how strong or soft the blur, make sure it complements the overall composition of the image. The blur should enhance the focal point without overwhelming the image. It’s about creating harmony between the sharp and blurred areas, guiding the viewer’s attention.
Benefits of Blurring an Image
Blurring an image offers several key benefits that can enhance both the aesthetic appeal and functionality of a photo. One of the primary advantages is privacy protection; blurring faces, license plates, or sensitive details in an image ensures that personal information remains secure when shared online or used in public spaces. This is particularly useful in social media, marketing, and security-related applications. Additionally, blurring can improve the overall visual composition of an image. For instance, by softening the background or surrounding elements, blur can help draw attention to the main subject, creating a professional and focused look. In artistic contexts, blurring can be used to convey motion or depth, adding dynamism or a dreamlike quality to a photo. It can also be used creatively in graphic design, where subtle blur effects help blend elements together, enhancing the visual flow. Whether for practical reasons like privacy or for creative enhancement, the ability to blur an image opens up many possibilities in both professional and personal image editing.
Common Mistakes When Blurring Images
When blurring images, several common mistakes can impact the quality and effectiveness of the result. One of the most frequent errors is overusing the blur effect. Applying too much blur can make the image appear overly soft or even unrecognizable, diminishing its overall impact. It’s important to find the right balance where the blur enhances the image without making it lose its detail and character. Another mistake is blurring the wrong parts of the image. While selective blurring can help direct attention to certain areas, blurring critical details such as faces or text without intention can detract from the message or purpose of the image. Additionally, not adjusting the blur intensity properly can result in an unnatural effect, either making the blur too subtle or too harsh. A blur that’s too subtle might go unnoticed, while an overly strong blur can make the image look distorted. To avoid these pitfalls, it’s essential to use the blur effect thoughtfully, adjusting intensity and carefully choosing the areas to blur to achieve the desired outcome.
Image Blur in Different Fields
Photography
- Portrait Photography: In portrait photography, blur (often achieved with a shallow depth of field) helps to create a smooth, blurred background, making the subject stand out. This effect is called bokeh and is often used to focus attention on the person being photographed while blurring out distracting elements in the background.
- Landscape Photography: Blur is used to create a sense of depth in landscapes. For example, by blurring parts of the image that are further away, photographers can give the impression of distance, making the subject pop against a softer, out-of-focus backdrop.
- Creative Effects: Photographers sometimes use motion blur to capture a sense of movement or energy. For example, the blur of a moving car or a person walking adds dynamic qualities to a still photo.
Graphic Design
- Backgrounds: Graphic designers often blur background elements in designs (posters, websites, advertisements) to keep the focus on the main content, whether it’s text or images. This allows for a clean, uncluttered look while maintaining visual interest in the composition.
- Product Design: In product mockups, blur is sometimes used to emphasize a particular product by blurring the background to give it more prominence and keep the viewer’s attention where it’s needed.
- UI/UX Design: Blurring is also a common effect in user interface design. For example, a blurred background behind a dialog box or a modal helps create visual separation, ensuring that users focus on the pop-up without distractions.
Social Media & Marketing
- Privacy Protection: Blurring is crucial in the context of privacy protection, especially when sharing images online. Faces, license plates, and other identifying information are often blurred to protect privacy when images are posted on social media or shared for marketing purposes.
- Emotional Impact: In some instances, marketers use blur as a tool to evoke certain emotions or themes in an image. For example, a blurred image with a vignette effect can convey a sense of mystery, nostalgia, or romance, depending on the context.
- Branding: Blurring can be used creatively to align with a brand’s aesthetic. For example, a brand may use a subtle blur effect in its promotional material to reinforce a clean, minimalist, or futuristic look.
Digital Art
- Simulating Camera Effects: Digital artists often mimic real-world camera effects in their art, including blurring. They might blur the background in a piece to simulate a shallow depth of field (like in a portrait), or they may use motion blur to add action to an artwork.
- Creating Atmosphere: In digital painting, blur can be used to create atmospheric effects like fog, mist, or haze, contributing to the mood of the artwork. Artists may blur areas to create soft transitions between light and dark or simulate the effects of light scattering.
- Layering and Focus: In digital art, blur can help separate elements by focusing on the sharpness of the main subject while blurring the surroundings. This technique helps guide the viewer’s eye to specific areas of the artwork.
Video and Film Production
- Depth of Field: Similar to photography, blur is used in film to direct attention to specific characters or objects while creating a sense of depth. In cinematic shots, objects closer to the camera are in focus, while those further away are blurred, emphasizing the foreground.
- Motion Blur: In action scenes, motion blur is often used to enhance the sense of speed and movement. Fast-moving objects or people leave a streaked, blurred trail, making the scene feel more dynamic and intense.
- Visual Effects: Blur can also be applied to certain elements in post-production to create special effects. For instance, creating a dream-like sequence in a movie might involve blurring the entire scene or parts of it to give a surreal, ethereal feel.
Medical Imaging
- Image Processing: In fields like medical imaging, image blur is often used to reduce noise and make medical scans (such as CT scans, MRIs, or X-rays) easier to interpret. However, too much blur can obscure vital details, so it’s important to balance the effect.
- Enhancing Specific Areas: Sometimes, blur techniques are used to emphasize or focus on specific areas of interest in a medical image, such as highlighting a tumor or abnormality in an X-ray or MRI scan.
Law Enforcement & Security
- Facial Recognition and Surveillance: In some surveillance footage, blurring is used to protect the identities of individuals, especially in public spaces or sensitive situations. This ensures that people’s privacy is respected while still allowing law enforcement or security personnel to gather important information.
- Digital Evidence: In digital evidence, blurring is used to obscure sensitive information, such as personal identifiers or confidential details, before it is shared or presented in court or other legal contexts.
Alternatives to Blurring
Pixelation
- Description: Pixelation involves replacing the detail of an area in an image with larger colored blocks or “pixels,” making it impossible to identify finer details.
- When to Use: Pixelation is often used as an alternative to blurring when you need to obscure sensitive information (like faces, license plates, or text) in a more noticeable way. It’s commonly used in media to anonymize people or objects.
- Advantages: The pixelated effect is more noticeable and provides a clear signal that something has been intentionally obscured.
- Disadvantages: Unlike blur, which can look more natural, pixelation is harsh and creates a more artificial look.
Vignette Effect
- Description: A vignette darkens or lightens the edges of an image while keeping the center clear and focused. It’s often used to direct attention toward the center or key subject of the image.
- When to Use: A vignette is ideal when you want to emphasize a subject in the middle of the frame while subtly reducing distractions at the edges. It’s a more subtle way of drawing focus than using blur.
- Advantages: Vignetting doesn’t distort the details of the image; instead, it creates a natural and often artistic frame around the subject.
- Disadvantages: It may not be suitable when you want to obscure parts of the image entirely, especially if you need to hide private details.
Sharpening
- Description: Sharpening enhances the contrast between adjacent pixels, making edges appear crisper and more defined. It’s essentially the opposite of blur.
- When to Use: You would sharpen an image to make the details clearer and more precise, especially when you want to enhance the focus on specific areas, such as text or fine details.
- Advantages: Sharpening helps highlight the most important features without altering the look of the surrounding image.
- Disadvantages: Over-sharpening can lead to unnatural halos around edges and an increased amount of noise or grain in the image.
Contrast Adjustment
- Description: Increasing the contrast between light and dark areas in an image can make certain areas stand out more, which can be used to guide the viewer’s attention.
- When to Use: If your goal is to bring emphasis to a particular part of the image without completely obscuring others, increasing contrast can help without the need for blurring.
- Advantages: Enhances the visibility of objects or people in the image, drawing attention without distorting the image.
- Disadvantages: Excessive contrast can make the image look harsh or unnatural, and it doesn’t help when you need to hide or obscure something.
Black and White Conversion.
- Description: Converting an image to black and white (grayscale) removes the color information, which can make the image appear less distracting.
- When to Use: If you want to reduce visual clutter and focus attention on the structure or textures of the image without drawing too much attention to specific details, black and white conversion can be helpful.
- Advantages: This technique helps simplify the image and can emphasize shape and form over color, which is useful for certain artistic or professional contexts.
- Disadvantages: If the purpose is to obscure private information, black and white might not be effective in hiding details like color-based identification.
Cropping
- Description: Cropping removes parts of the image to focus on a specific area or subject. It’s a straightforward way to remove unnecessary or unwanted parts.
- When to Use: Cropping is effective when you want to get rid of distracting elements or hide irrelevant details, especially when the information to be removed is on the edges of the image.
- Advantages: It’s a non-destructive way to adjust the composition of an image without altering the quality of the remaining areas.
- Disadvantages: It doesn’t help if you need to blur or obscure sensitive information that’s in the middle of the image.
Masking or Layering
- Description: Masking involves creating a mask over a specific area of an image, allowing you to modify or obscure just that part of the photo without affecting the rest. Layering can be used to add new elements on top of the existing image.
- When to Use: If you want to keep certain parts of the image intact while modifying others, such as by adding text or shapes, masking is an ideal solution.
- Advantages: It offers precise control over which parts of the image are affected, providing flexibility in how you alter the image.
- Disadvantages: It can be more complex to execute compared to simple blurring or cropping, especially for beginners.
Color Desaturation
- Description: Unlike converting to full black and white, color desaturation reduces the intensity of the colors without completely eliminating them.
- When to Use: Use desaturation when you want to downplay the vibrancy of an image or specific areas while retaining some color information.
- Advantages: It creates a more subtle effect than full black-and-white conversion, giving the image a more muted tone.
- Disadvantages: Desaturation doesn’t effectively obscure sensitive information or create a dramatic focus shift.
Conclusion
Blurring an image is a versatile and valuable technique in both photography and digital media. Whether used to enhance aesthetics, protect privacy, simulate movement, or direct attention to specific areas of an image, blur effects provide numerous creative possibilities. With a variety of blur types available, from Gaussian to motion blur, users can adjust the intensity and application of the effect to suit their needs. By understanding how to control and apply blur, anyone can elevate their images, whether for professional design, artistic expression, or personal use. It’s important to strike a balance in using blur, ensuring it enhances the image rather than overpowering its quality. Overall, image blurring is a powerful tool in any image editor’s toolkit, offering both practical and creative benefits.